A follow-up to this post has been published here. It includes a history of fluid preservation and the exact methods I use for my own specimens, which I recommend if you are able to buy the materials in your location. Please read through this post and that one for best results.
Just like cleaning bones and collecting taxidermy, collecting weird dead things in jars is a new favorite hobby of many people. The oddities business is booming, and the going rate for a thing in a jar is on the rise. There are lots of people selling jarred specimens as well as many others who want to collect things for themselves without trying to make a business out of it. Regardless of why you’re interested in learning to make a decent wet specimen, unless you follow instructions and properly preserve the specimen, it’ll end up rotting, floating, stinky, and ruined. Let’s learn about some museum-quality techniques, shall we?
Disclosure: This post contains Amazon affiliate links, which means I may make a very very very small commission if you click on the links and purchase the items. I only link to items I actually use, and the commission allows me to keep writing informative posts like this one.
This guide may include some graphic descriptions that are not for everyone - if you are easily grossed out, preserving dead animals is likely not a great hobby for you to partake in. This guide is intended for people who already have a basic understanding of wet specimen practices. I will not be including step-by-step photos for this post but rather, general guidelines and photos of a few finished products so that every reader can take the basic guidelines and develop their own technique.
I published a guide to taxidermy with step-by-step photos and a materials list at this link for $20, or follow my Instagram page here. I also offer classes on specimen preservation around the United States, if you have a larger budget of $150-200.
Please make sure to read this entire guide thoroughly before embarking on any type of embalming project.

A geriatric hedgehog preserved in a very tight jar.
It’s difficult to find a concise guide to making a wet specimen because there are so many ways to do it. Read through this entire guide before you try the process so you can decide whether this is the guide you want to use. I will be providing links to others as well, which are great supplementary reading.
There are many different things that can be made into wet specimens. The most popular are fetal animals, organs, prosections and dissections (specimens that have been cut open or prepared to allow the viewer to see internal structures), and juvenile or adult animals that are fully formed. Regardless of what type of specimen you’re using, it needs to be injected or embalmed with fluid, fixed in a preservative, and transferred to new preservative before being sealed in a jar and stored or displayed safely.
One thing I can tell you is that every single tutorial on YouTube I have seen is incorrect. You CANNOT just dump rubbing alcohol onto a specimen and call it good. If you want high-quality specimens that last a long time, you have to follow a series of steps to ensure your specimens are preserved correctly.
First things first - where do you get an animal to work on? This is a tricky thing. Lots of people have varying opinions on what is or is not “kosher” in these situations. You can read this post I wrote about “ethically sourced” taxidermy and specimens. Spoiler alert: stop using the term "ethically sourced" to describe anything. It's ambiguous and annoying. Sustainability is what matters, and I wrote about it in the post I just linked.
The majority of specimens I work on for one-offs like individual taxidermy or specimen preservation projects come from two places, a wildlife rehabber and a reptile breeder. I appreciate both of these sources because I know those two people personally and they care deeply for their animals. I am 100% sure that the animals have not suffered any type of abuse. Where you get your animals is up to you, but the most important thing when it comes to a high-quality specimen is to make sure the animal was frozen as soon as possible after death to avoid any type of decay or contamination.

Sheep eyeballs, a byproduct of the meat industry.
Got your frozen dead thing? Cool. Thaw it out for several hours - the amount of time depends on the size of the specimen. Ideally you want the specimen to be pliable and thawed, but not room-temperature (still cold is better and inhibits bacterial activity).
Find a well-ventilated area (outdoors is easiest) and ALWAYS wear a respirator. Using nonporous, hypoallergenic powder-free nitrile gloves and a puppy pee pad with a plastic backing, which absorbs extra fluid and doesn’t allow it to leak through, prepare your work station. You’ll need a hypodermic needle, a syringe, and a fixative, typically formalin but I’ll discuss other options further down the page. Inject the fixative into the entire specimen - the mouth, through the ears, if the eyes are going to be closed inject the eyeballs, the body cavity, through the anus, into all the large muscles including the ones in limbs. You want the entire specimen to be filled and bloated-looking with fixative. For larger specimens with hair, you can make tiny incisions in the skin to allow the fixative to soak in (explained in the next paragraph). The goal is to get the whole specimen, including under the skin, as filled with fixative as possible. Do not use isopropyl alcohol for this step, as it is not a strong enough chemical.
Next, place the specimen in a large jar in the position you want it to stay in for display - it will stay in that position once you are done. Fill the container with the same fixative you used to inject the specimen and seal it. Most fixatives like humectant fluid and formalin cause all of the tissues to start to harden, so remember that however you preserve it at this stage will be how the specimen is positioned forever. Leave the specimen for several days, weeks, or months depending on the size. Shake the jar (with the lid on) every few days in order to agitate the fixative and encourage fluid exchange.
NOTES HERE:
Specimen containers MUST be made of glass or if you absolutely have your heart set on using plastic jars, you have to make sure it won't chemically react with your preserving fluid or your final chemical bath - otherwise it could melt and leak!
If your specimen floats, it's possible that it's rotten or that you injected air bubbles. Make small incisions to allow gases to escape. Shaking helps with floating as well - birds are more likely to float early on because of their bones.
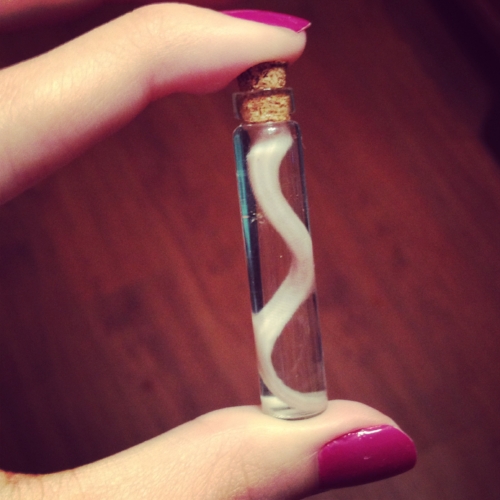
A mouse tail, which was eventually made into a pendant.
When that time period is over, transfer the specimen into a secondary solution of diluted isopropyl or ethanol alcohol for storage in the container of your choice for display. My preferred percentage is 70%, especially for animals with no hair or for organ specimens as stronger alcohol (90% or more) can cause the tissue to wrinkle and shrivel. I also prefer glass jars with lids that seal completely. Leave the specimen in the secondary solution for about a week, shaking the jar gently each day. It is typical that the liquid will change color due to blood and other liquid leaking out of the body - don’t be alarmed by this. After a week or two, drain all the liquid, rinse the specimen and put it back in the jar, and replace the secondary solution with fresh new liquid. After this liquid replacement, the jar can be sealed indefinitely.
Once your specimen is transferred from your first solution (the initial type you also injected) into your second solution (alcohol) you can filter your initial solution through a coffee filter and funnel and re-use it.
Once the jar is sealed, your work is not completed. Properly caring for your collection of jarred specimens is important, not just so they stay in good condition but also so that you don’t burn your house down. NEVER store a wet specimen somewhere that is overly warm (a house in the summer with no air conditioning) and always keep them away from direct sunlight. Never ever ever smoke or burn candles nearby and never store your specimens near a heater or fireplace - they are extremely flammable!

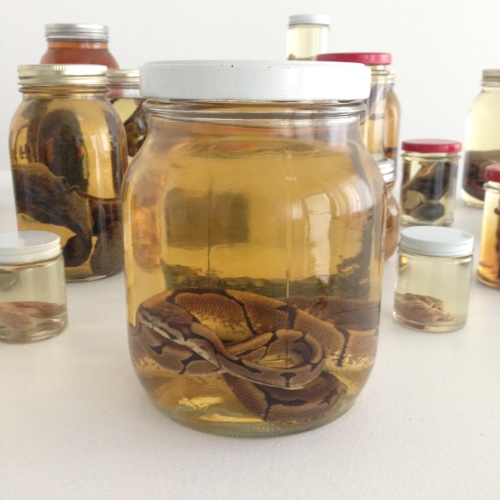
The first wet specimen I ever made - a young ball python. This piece has held up very well over the years and is still part of my collection.
The chemicals used in preservation processes are harsh and some are known carcinogens. It is your responsibility to read the MSDS information on these chemicals and store them in a safe way. It is also your responsibility to make sure the specimens you are processing are legal to possess in your city, state, or region. Some things are federally protected. Use your brain and don’t end up in prison. Charlie Kelly's references to "bird law" are rooted in fact, y’all.
If you are using a whole animal specimen that is on the larger size, consider removing its intestines prior to storage. This can be accomplished by pulling them out through the anus using forceps and then disposing of them. A strong stomach (yours, not the animal’s stomach!) is a must - this is not for the faint of heart. (Oh, come on, I can’t resist dumb anatomy puns!)
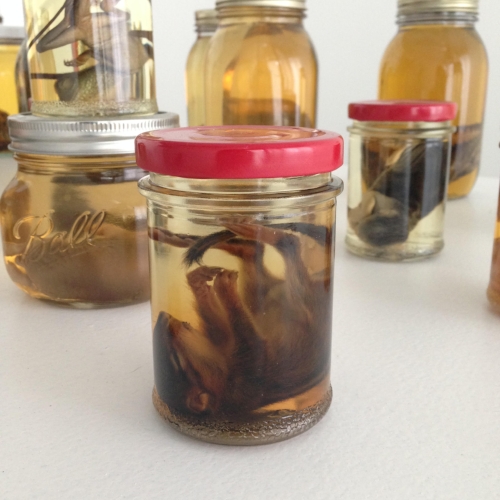
Here is the same snake after more than three years. I never changed the liquid, but it still looks alright!
Here is a list of preserving chemicals and their uses. Access to a chemistry lab is likely best for those attempting to mix their own solutions. If you are diluting anything, always use distilled water as it does not have mineral impurities like spring water or tap water. If you’re not a Walter White, there are still plenty of options for obtaining chemicals legally and safely.
Formalin: you may be able to acquire it from a chemical supply warehouse but typically those institutions require you to obtain licensing as either a medical facility or an educator/school in order for you to make a purchase. As stated above, do not leave your specimen in formalin forever - it is acidic and will eventually destroy the specimen if left forever. Use it to fix the specimen and then transfer it to a less harsh solution. Make sure you use buffered 10% formalin.
Ethanol is available at any hardware store or online. If you can’t find it, ask - it’s used as fuel and usually sold in metal containers. When using ethanol, dilute it to 70% if it does not come already diluted. Remember - dilute with distilled water only - no other water.
Denatured alcohol and isopropyl alcohol are also available online or at at hardware stores or pharmacies, respectively.
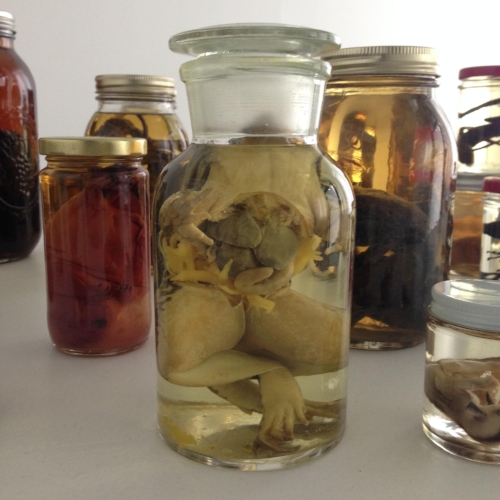
This is a partially dissected frog. He could probably stand to be in a larger jar, but is otherwise in great shape.
Additional reading:
Learn about preserving reptiles and amphibians on Mark D. Scherz’ blog.
Isopropyl Alcohol and Propylene Glycol combined makes humectant fluid (used most often in museums in Australia) which you can buy already mixed here.
This is an article about preserving specimens for collections in museums and other institutions.
Here is a list of rules about animal parts and their laws.
Another great resource is taxidermy.net, if you know where to look.
Want to try something different? Preserve plant life in the same way! I’m sure it’ll add a nice flair to your collection. I've actually preserved a pineapple for a client. Update: I also preserved another pineapple and an apple for other clients.
This is a baby chipmunk that needs its liquid changed. You can see in the background that over time, the liquid starts to darken no matter what. Fun fact: in museum archives, the liquid is considered to be "part of" the specimen. The liquid can be topped off, but never replaced - so there are jars in the Field Museum that are over 100 years old that are pitch black. We only know what's in them because of the labels!
The short version: use gloves and a puppy pee pad for handling your specimen. Use a hypodermic needle and luer-lock syringe to inject your specimen with an initial solution (either humectant fluid, which you can make from ethyl or isopropyl alcohol or ethanol and propylene glycol, or formalin) and allow it to soak in a jar full of the initial solution for several weeks. Shake the jar gently every few days and then transfer the specimen to a jar of secondary solution (either isopropyl alcohol, ethyl alcohol, or denatured alcohol) and repeat the process for two to three weeks. It does not matter which initial and secondary solutions you choose - but once you use one type of initial solution, do not cross-contaminate by switching to a different initial solution in the same specimen. Similarly, stick to only one secondary solution and do not mix different types of alcohol. After three weeks of soaking in the initial solution and three weeks in your secondary solution, replace your secondary solution with the same type of alcohol and seal your jar for permanent storage. Make a note of what you did and when you did it, in pencil on an acid-free piece of paper and use archival tape to tape it to the bottom. That way, you or anyone else who handles the specimen in the future will know what's in there.
Restoring old specimens
If you are trying to restore an old specimen, in my experience this has worked well. Use gloves and a puppy pad in a well-ventilated area. Gently rinse your specimen with distilled water, using a squeeze bottle if necessary to remove any debris. Make sure your jar has been washed with soap and rinsed with distilled water and fully dried before replacing your specimen in the jar. Replace the liquid with 70% isopropyl alcohol (this is the most neutral of the secondary solutions I have listed) and ensure that the jar is sealed. Make a note of what you did and when you did it, in pencil, on an acid-free piece of paper and use archival tape to tape it to the bottom. That way, you or anyone else who handles the specimen in the future will know what's in there.
Thanks for stopping by! I hope you found this post interesting and helpful. Due to overwhelming response, I am unable to troubleshoot what you may be doing wrong or offer further advice on making wet specimens if you have not paid me for my services. I will be approving comments but not responding to questions. This is not an all-inclusive guide but meant to be a starting point. Preserving animals is how I make my living - if you would like to gain some hands-on experience as well as support my small business, please consider:
Purchasing my taxidermy e-book for $20 and teaching yourself how to make professional-grade taxidermy.
Signing up for one of my many specimen preservation classes offered around the world.
I appreciate your support!
-Mickey